PowerShellでWebサーバーのセキュリティ対策を自動化した話
PowerShellでWebサーバーのセキュリティ対策を自動化した
旧サーバーで実施したセキュリティ対策を新しく構築するサーバー(2台)でも実施する必要があった.
対策を手で2台もやるのはめんどくさい大変なのでスクリプトで自動化した.
実現したこと
- SSL証明書をインポートし, HTTPS通信を有効にする.
- レジストリを編集し, 脆弱な暗号化方式を無効にする.
- セキュリティ診断対応済みの設定ファイルをIISのルートディレクトリに配備し, 以下の脆弱性を解消する.
- urlscanをインストールし, 推奨されないHTTPメソッドを無効にする.
スクリプト
構成
ResolveVulnerability
┣Functions
┃┣Deploy-WebConfig.ps1
┃┣Disable-Encryption.ps1
┃┣Enable-SSL.ps1
┃┣Install-UrlScan.ps1
┃┣Remove-IISDefaultItems.ps1
┃┗Restart-IIS.ps1
┣Certificate
┃┗certificate.pfx
┣Config
┃┣UrlScan.ini
┃┗web.config
┣Installer
┃┗urlscan_v31_x64.msi
┗Script
  ┣Config.ps1
  ┣Index.ps1
  ┗Resolve-Vulnerability.ps1
実行方法
管理者権限でPowerShellを起動して下記コマンドを実行するだけ.
Set-Location C:\ResolveVulnerability
.\Resolve-Vulnerability.ps1
ただ, インポートするSSL証明書は事前に用意してね.
中身
Resolve-Vulnerability.ps1でFunctions内の関数を呼ぶ感じ. Resolve-Vulnerability.ps1ではIndex.ps1を読み込む.
Resolve-Vulnerability.ps1
. ("{0}/Index.ps1" -f (Split-Path $MyInvocation.MyCommand.Path -Parent))

# SSL証明書をインポートし, https通信を有効にする
Enable-SSL -CertPath $CertPath -CertPass $CertPass -TargetSite $TargetSite

# 脆弱な暗号化方式を無効化する
# Protocols
Disable-Encryption -Key $SSL2Server
Disable-Encryption -Key $SSL2Client
Disable-Encryption -Key $SSL3Server
Disable-Encryption -Key $SSL3Client
# Cipher
Disable-Encryption -Key $CiphersNULL
Disable-Encryption -Key $DES
Disable-Encryption -Key $RC2_40
Disable-Encryption -Key $RC2_56
Disable-Encryption -Key $RC2_128
Disable-Encryption -Key $RC4_40
Disable-Encryption -Key $RC4_56
Disable-Encryption -Key $RC4_128
Disable-Encryption -Key $RC4_64
Disable-Encryption -Key $3DES
# Hashes
Disable-Encryption -Key $MD5
# KeyExchangeAlgorithms
Disable-Encryption -Key $DiffieHellman

# レジストリの設定を有効にするためIISを再起動する
Restart-IIS $IISSvcName

<# IISのルートディレクトリにWeb.configを配備することで下記セキュリティ対策を実施する
    ・セキュリティ上推奨されるHTTPヘッダーを付加する
    ・規定のドキュメントを無効にする(デフォルトのページが非表示になる)
    ・ディレクトリリスティングを無効にする #>
Deploy-WebConfig -WebConfigSrc $WebConfigSrc -IISRoot $IISRoot -WebConfigFile $WebConfigFile

# デフォルトのiisページを消す
Remove-IISDefaultItems $IISDefaultItems

# urlscanインストールして設定ファイル置換する
Install-UrlScan -UrlScanInstaller $UrlScanInstaller -UrlScanConfigSrc $UrlScanConfigSrc -UrlScanConfigDst $UrlScanConfigDst -UrlScanConfigFile $UrlScanConfigFile
Index.ps1ではConfig.ps1とFunctions内のスクリプトを一括で読み込む.
Index.ps1
Set-Variable -Name BVIndexRoot -Value (Split-Path $MyInvocation.MyCommand.Path -Parent) -Option Constant

# 設定ファイル
. ("{0}\Config.ps1" -f $BVIndexRoot)

# 関数
Set-Variable -Name BVFunctionsRoot -Value ("{0}\Functions" -f $BVIndexRoot) -Option Constant
Get-ChildItem -Path $BVFunctionsRoot | ForEach-Object { . ("{0}\{1}" -f $BVFunctionsRoot, $_)}
Config.ps1に設定をまとめる.
Config.ps1
# スクリプトのパス
Set-Variable -Name RVConfRoot -Value (Split-Path $MyInvocation.MyCommand.Path -Parent) -Option Constant

#-- 証明書インポート/HTTPS有効 start --#
# 証明書のパス
Set-Variable -Name CertPath -Value ("{0}\Certificate\certificate.pfx" -f $RVConfRoot) -Option Constant
# 証明書のパスワード
Set-Variable -Name CertPass -Value "1qwertyuiop@" -Option Constant
# HTTPS通信の対象サイト
Set-Variable -Name TargetSite -Value "Default Web Site" -Option Constant
#-- 証明書インストール/HTTPS有効 end --#

#-- 脆弱性のある暗号化方式対策 start --#
# Protocols
Set-Variable -Name SSL2Server -Value 'HKLM:\SYSTEM\CurrentControlSet\Control\SecurityProviders\SCHANNEL\Protocols\SSL 2.0\Server' -Option Constant
Set-Variable -Name SSL2Client -Value 'HKLM:\SYSTEM\CurrentControlSet\Control\SecurityProviders\SCHANNEL\Protocols\SSL 2.0\Client' -Option Constant
Set-Variable -Name SSL3Server -Value 'HKLM:\SYSTEM\CurrentControlSet\Control\SecurityProviders\SCHANNEL\Protocols\SSL 3.0\Server' -Option Constant
Set-Variable -Name SSL3Client -Value 'HKLM:\SYSTEM\CurrentControlSet\Control\SecurityProviders\SCHANNEL\Protocols\SSL 3.0\Client' -Option Constant
# Ciphers
Set-Variable -Name CiphersNULL -Value 'HKLM:\SYSTEM\CurrentControlSet\Control\SecurityProviders\SCHANNEL\Ciphers\NULL' -Option Constant
Set-Variable -Name DES -Value 'HKLM:\SYSTEM\CurrentControlSet\Control\SecurityProviders\SCHANNEL\Ciphers\DES 56\56' -Option Constant
Set-Variable -Name RC2_40 -Value 'HKLM:\SYSTEM\CurrentControlSet\Control\SecurityProviders\SCHANNEL\Ciphers\RC2 40/128' -Option Constant
Set-Variable -Name RC2_56 -Value 'HKLM:\SYSTEM\CurrentControlSet\Control\SecurityProviders\SCHANNEL\Ciphers\RC2 56/128' -Option Constant
Set-Variable -Name RC2_128 -Value 'HKLM:\SYSTEM\CurrentControlSet\Control\SecurityProviders\SCHANNEL\Ciphers\RC2 128/128' -Option Constant
Set-Variable -Name RC4_40 -Value 'HKLM:\SYSTEM\CurrentControlSet\Control\SecurityProviders\SCHANNEL\Ciphers\RC4 40/128' -Option Constant
Set-Variable -Name RC4_56 -Value 'HKLM:\SYSTEM\CurrentControlSet\Control\SecurityProviders\SCHANNEL\Ciphers\RC4 56/128' -Option Constant
Set-Variable -Name RC4_128 -Value 'HKLM:\SYSTEM\CurrentControlSet\Control\SecurityProviders\SCHANNEL\Ciphers\RC4 128/128' -Option Constant
Set-Variable -Name RC4_64 -Value 'HKLM:\SYSTEM\CurrentControlSet\Control\SecurityProviders\SCHANNEL\Ciphers\RC4 64/128' -Option Constant
Set-Variable -Name 3DES -Value 'HKLM:\SYSTEM\CurrentControlSet\Control\SecurityProviders\SCHANNEL\Ciphers\Triple DES 168' -Option Constant
# Hashes
Set-Variable -Name MD5 -Value 'HKLM:\SYSTEM\CurrentControlSet\Control\SecurityProviders\SCHANNEL\Hashes\MD5' -Option Constant
# KeyExchangeAlgorithms
Set-Variable -Name DiffieHellman -Value 'HKLM:\SYSTEM\CurrentControlSet\Control\SecurityProviders\SCHANNEL\KeyExchangeAlgorithms\Diffie-Hellman' -Option Constant
#-- 脆弱性のある暗号化方式対策 end --#

#-- IISサービス設定 start --#
# IISサービス名
Set-Variable -Name IISSvcName -Value 'W3SVC' -Option Constant
#-- IISサービス設定 end --#

#-- Web.config配置設定 start --#
# セキュリティ上推奨されるHTTPヘッダーを追加するWeb.configのディレクトリ
Set-Variable -Name WebConfigSrc -Value ('{0}\Config' -f $RVConfRoot) -Option Constant
# セキュリティ上推奨されるHTTPヘッダーを追加するWeb.config
Set-Variable -Name WebConfigFile -Value 'web.config' -Option Constant
# IISのルートディレクトリ
Set-Variable -Name IISRoot -Value 'C:\inetpub\wwwroot' -Option Constant
#-- Web.config配置設定 end --#

#-- 削除するIISデフォルトアイテム start --#
# IISのデフォルトアイテム一覧
$IISDefaultItems = @(('{0}\iis-85.png' -f $IISRoot), ('{0}\iisstart.htm' -f $IISRoot))
Set-Variable IISDefaultItems -Option ReadOnly
#-- 削除するIISデフォルトアイテム end --#

#-- Web.config配置設定 start --#
# urlscanのインストーラー
Set-Variable -Name UrlScanInstaller -Value ('{0}\Installer\urlscan_v31_x64.msi' -f $RVConfRoot) -Option Constant
# UrlScan設定ファイルのディレクトリ
Set-Variable -Name UrlScanConfigSrc -Value ('{0}\Config' -f $RVConfRoot) -Option Constant
# UrlScan設定ファイルの配置先
Set-Variable -Name UrlScanConfigDst -Value 'C:\Windows\System32\inetsrv\urlscan' -Option Constant
# UrlScan設定ファイル
Set-Variable -Name UrlScanConfigFile -Value 'UrlScan.ini' -Option Constant
#-- Web.config配置設定 end --#
あとは関数たち.
Deploy-WebConfig.ps1ではIISのルートディレクトリにセキュリティ診断対策を施した設定ファイルを置くだけ.
Deploy-WebConfig.ps1
function Deploy-WebConfig() {
    <#
    .SYNOPSIS
    Web.configを配備します.
    .DESCRIPTION
    IISのルートディレクトリにセキュリティ上推奨されるHTTPヘッダーを付加するようになります.
    規定のドキュメントを無効にします.
    #>
    Param(
        $WebConfigSrc,
        $IISRoot,
        $WebConfigFile
    )
    Robocopy.exe $WebConfigSrc $IISRoot $WebConfigFile
}
Disable-Encryption.ps1ではレジストリを弄って脆弱性のある暗号化方式を無効にする.
Disable-Encryption.ps1
function Disable-Encryption() {
    <#
    .SYNOPSIS
    指定したキーの暗号化を無効化します.
    #>
    Param(
        $Key
    )

    New-Item $Key -Force
    New-ItemProperty -path $Key -name Enabled -value 0 –PropertyType DWORD
    if($Key.Contains("SSL")){
        # SSLはDisabledByDefaultも設定する
        New-ItemProperty -path $Key -name DisabledByDefault -value 1 –PropertyType DWORD
    }
}
Enable-SSL.ps1ではSSL証明書をインポートしてHTTPSの443にバインドする.
Enable-SSL.ps1
function Enable-SSL(){
    <#
    .SYNOPSIS
    SSL証明書をインポートし, https通信を有効にします.
    #>
    Param(
        $CertPath,
        $CertPass,
        $TargetSite
    )

    # 証明書をインポートする
    $cert = Import-PfxCertificate -Filepath $CertPath -Password (ConvertTo-SecureString $CertPass -AsPlainText -Force) -CertStoreLocation "Cert:\LocalMachine\My" -Exportable
    # IISに443httpsバインドを作成する
    New-WebBinding -Name $TargetSite -IP "*" -Port 443 -Protocol https
    # httpsバインドを取得し証明書を設定する
    $httpsBinding = Get-WebBinding -Protocol https
    $httpsBinding.AddSslCertificate($cert.GetCertHashString(),"my")
}
Install-UrlScan.ps1ではUrlScanをインストールして, 設定ファイルを置き換える.
Install-UrlScan.ps1
function Install-UrlScan() {
    <#
    .SYNOPSIS
    urlscanをインストールしセキュリティ対策を施した設定ファイルに置き換えます.
    #>
    Param(
        $UrlScanInstaller,
        $UrlScanConfigSrc,
        $UrlScanConfigDst,
        $UrlScanConfigFile
    )

    $process = Start-Process -FilePath "msiexec.exe" -ArgumentList ("/i {0} /passive" -f $UrlScanInstaller) -Verb runas -PassThru
    Wait-Process -Id ($process.Id)
    Rename-Item -Path ("{0}\{1}" -f $UrlScanConfigDst, $UrlScanConfigFile) -NewName ("_{0}" -f $UrlScanConfigFile) -Force
    Robocopy.exe $UrlScanConfigSrc $UrlScanConfigDst $UrlScanConfigFile
}
Remove-IISDefaultItems.ps1ではIISをインストールした際にデフォルトで置かれているアイテムを削除する.
Remove-IISDefaultItems.ps1
function Remove-IISDefaultItems() {
    <#
    .SYNOPSIS
    IISのデフォルトページや画像を削除します.
    #>
    Param(
        $Items
    )

    foreach($item in $Items) {
        if(Test-Path $item){
            Remove-Item -Path $item -Force
        }
    }
}
Restart-IIS.ps1ではIISを再起動する. わざわざ関数にしなくても
Restart-IIS.ps1
function Restart-IIS() {
    <#
    .SYNOPSIS
    IISを再起動します.
    #>
    Param(
        $SvcName
    )

    Restart-Service $SvcName
}
Web.configの中身
- defaultDocumentで規定のドキュメントを無効にする(本番環境にデフォルトのページはいらない).
- directoryBrowseでディレクトリリスティング(ブラウザにディレクトリ構造見せちゃうヤツ)を無効にする.
- customHeadersで推奨されるHTTPヘッダーを追加する.
<?xml version="1.0" encoding="UTF-8"?>
<configuration>
    <system.web>
        <httpRuntime enableVersionHeader="false" />
    </system.web>
    <system.webServer>
        <defaultDocument enabled="false" />
        <directoryBrowse enabled="false" />
        <httpProtocol>
          <customHeaders>
            <clear/>
            <remove name="X-Powered-By"/>
            <add name="X-XSS-Protection" value="1; mode=block"/>
            <add name="X-Frame-Options" value="DENY"/>
            <add name="X-Content-Type-Options" value="nosniff"/>
          </customHeaders>
        </httpProtocol>
    </system.webServer>
</configuration>
UrlScan.iniの中身
- OPTIONSを明示的に無効にする(Webサーバーが許可しているメソッドが表示されちゃうからね).
[AllowVerbs]

;
; The verbs (aka HTTP methods) listed here are those commonly
; processed by a typical IIS server.
;
; Note that these entries are effective if "UseAllowVerbs=1"
; is set in the [Options] section above.
;

GET
HEAD
POST

[DenyVerbs]

;
; The verbs (aka HTTP methods) listed here are used for publishing
; content to an IIS server via WebDAV.
;
; Note that these entries are effective if "UseAllowVerbs=0"
; is set in the [Options] section above.
;

PROPFIND
PROPPATCH
MKCOL
DELETE
COPY
MOVE
LOCK
UNLOCK
SEARCH
PUT
OPTIONS
PowerShellで設定ファイルの内容をコンソールとファイルに出力するようにしてみた
スクリプトを実行する際に設定ファイルの内容をコンソールで確認出来るようにしたらミスも防げるしいいかなーと思って考えてみた. ついでにtsvで出力出来るようにした.
スクリプト
設定ファイルはこんな感じ. PowerShellでは-Option Constantで定数を宣言できる. 変数の内容は-Descriptionで書く.
Get-Variableで変数の一覧を取得出来るがいらないものまで色々出てきてしまう(気になる人は手元でお試しあれ). そこで-Descriptionの先頭にタグを付けることでユーザー定義の変数かそうでないかを判別するようにした.
あとはFormat-Tableでコンソールに表示して, Export-Csvでファイル出力すれば出来上がり.
Config.ps1
# タグ
Set-Variable -Name UserDefinedVarTag -Value "UserDefinedVars:" -Option Constant
# サンプルフラグ
Set-Variable -Name IsSample -Value $true -Option Constant -Description ("{0}サンプルフラグ" -f $UserDefinedVarTag)
# スクリプトのパス
Set-Variable -Name ConfRoot -Value (Split-Path $MyInvocation.MyCommand.Path -Parent) -Option Constant -Description ("{0}スクリプトのパス" -f $UserDefinedVarTag)
# サンプルディレクトリ
Set-Variable -Name SampleDir -Value ("{0}\Sample" -f $ConfRoot) -Option Constant -Description ("{0}サンプルディレクトリ" -f $UserDefinedVarTag)
# ユーザー名
Set-Variable -Name UserName -Value "TestUser" -Option Constant -Description ("{0}ユーザー名" -f $UserDefinedVarTag)
# ユーザーパスワード
Set-Variable -Name UserPassword -Value "PaSsWoRd" -Option Constant -Description ("{0}パスワード" -f $UserDefinedVarTag)
# 設定ファイルの出力パス
Set-Variable -Name ConfFilePath -Value ("{0}\Config.tsv" -f $ConfRoot) -Option Constant -Description ("{0}設定ファイル内容出力先" -f $UserDefinedVarTag)

function Write-Config(){
    <#
    .SYNOPSIS
    設定内容をコンソールに出力します.
    #>

    $vars = @()
    Get-Variable | ForEach-Object{ if($_.Description -ne $null -and $_.Description.Contains($UserDefinedVarTag)) { $vars += $_ } }
    $vars | ForEach-Object{ $_.Description = $_.Description.Split(":")[1] }
    $vars | Select-Object -Property @{n="変数名"; e={$_.Name}}, @{n="値"; e={$_.Value}}, @{n="詳細"; e={$_.Description}} | Format-Table
    $vars | Select-Object -Property  @{n="変数名"; e={$_.Name}}, @{n="値"; e={$_.Value}}, @{n="詳細"; e={$_.Description}} | Export-Csv -Delimiter "`t" -Encoding default -Path $ConfFilePath -NoTypeInformation
}
設定ファイルを読み込んだスクリプトで関数を呼び出す.
Write-Config.ps1
set-variable -name ScriptRoot -value (Split-Path $MyInvocation.MyCommand.Path -Parent) -option Constant

# 設定ファイル読み込み
. ("{0}\Config.ps1" -f $ScriptRoot)

Write-Config
実行してみるとコンソールに設定内容がきれいに表示される.
PS D:\Sample> .\Write-Config.ps1

変数名       値                                             詳細
------       --                                             ----
ConfFilePath D:\Common\PowerShell\Modules\Sample\Config.tsv 設定ファイル内容出力先
ConfRoot     D:\Common\PowerShell\Modules\Sample            スクリプトのパス
IsSample     True                                           サンプルフラグ
SampleDir    D:\Common\PowerShell\Modules\Sample\Sample     サンプルディレクトリ
UserName     TestUser                                       ユーザー名
UserPassword PaSsWoRd                                       パスワード
ファイルにも出力される.
"変数名"  "値"   "詳細"
"ConfFilePath"  "D:\Common\PowerShell\Modules\Sample\Config.tsv"    "設定ファイル内容出力先"
"ConfRoot"  "D:\Common\PowerShell\Modules\Sample"   "スクリプトのパス"
"IsSample"  "True"  "サンプルフラグ"
"SampleDir" "D:\Common\PowerShell\Modules\Sample\Sample"    "サンプルディレクトリ"
"UserName"  "TestUser"  "ユーザー名"
"UserPassword"  "PaSsWoRd"  "パスワード"
http-serverでサクッとローカルにHTTPサーバをたてる
http-serverでサクッとローカルにHTTPサーバをたてる
ローカルにHTTPサーバたてたいなーと思ったので調べてみたら便利なものがあったので紹介します。
http-server
https://github.com/indexzero/http-server
Node.jsで動くHTTPサーバデス。
http-serverをインストールして起動してみる
HTTPサーバをたてたいところでまずはnpm init。
cd D:\Test\sample
npm init -y
続けてhttp-serverをインストールします。
今回はローカルに。
npm install http-server --save-dev
pakcage.jsonを修正します。
  "scripts": {
    "http-server": "http-server"
  }
これでhttp-serverを起動することが出来るようになりました。
あとはHTTPサーバにコンテンツを置いてブラウザから見てみましょう。
D:\Test\sample配下にPublicフォルダを作成します。
あとはPublicフォルダにコンテンツを置きます。
D:Test\Test\sample
├node_modules
├public
│ ├index.html
│ └sample.md
└pakcage.json
index.html
<DOCTYPE html> <html> <head> <title>サンプル</title> <meta charset="utf-8"> <style> body { font- family: 'Droid Serif'; } h1, h2, h3 { font-family: 'Yanone Kaffeesatz'; font-weight: normal; } .remark-code, .remark-inline-code { font-family: 'Ubuntu Mono'; } </style> </head> <body> <!-- Remarkjs --> <script src="https://remarkjs.com/downloads/remark-latest.min.js" type="text/javascript"></script> <script type="text/javascript"> var slideshow = remark.create({sourceUrl: "sample.md"}); </script> </body> </html>
sample.md
name: inverse
layout: true
class: center, middle, inverse
---
# 見れた?
では早速http-serverを起動してみましょう。
port番号は適当に10000を指定してます。
npm run http-server -- -p 10000
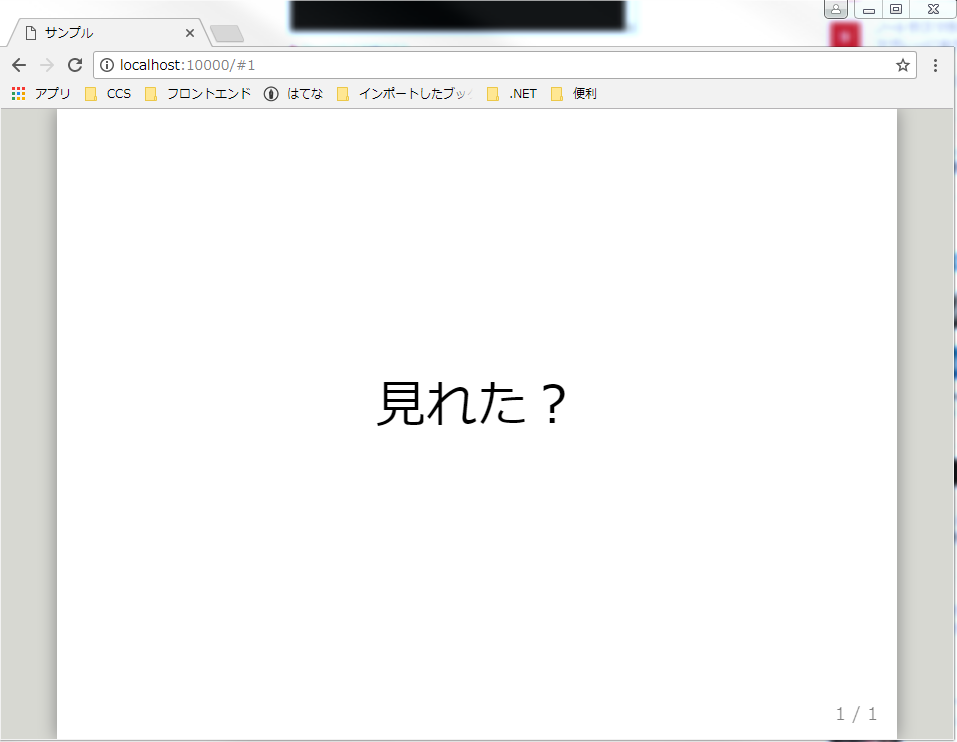
http://localhost:10000 にアクセスしてみます。

表示されましたー
たったこれだけでHTTPサーバが使えるなんて便利ですよね。
スタイルシートをバンドルする際は画像パスに注意
またASP.NETのバンドルの話です。
スタイルシートを何も考えずにまとめてバンドルする
とりあえずスタイルシートをまとめてみます。
bundles.Add(new StyleBundle("~/bundles/style").Include(
    "~/lib/bootstrap/css/bootstrap.min.css",
    "~/lib/jquery-ui/jquery-ui.css",
    "~/lib/font-awesome/css/font-awesome.css"
));
こうすると3つのスタイルシートは一つにバンドルされます。
画面でこのスタイルを読み込んでみます。
@using System.Web.Optimization
<!DOCTYPE html>

<html>
<head>
    <meta name="viewport" content="width=device-width" />
    <title></title>
    @Scripts.Render("~/bundles/scripts")
    @Styles.Render("~/bundles/styles")
    <script>
        $(function () {
            $("#hoge").dialog();
        })
    </script>
</head>
<body>
    <div id="hoge">閉じるボタンのアイコン見えてる?</div>
</body>
</html>
画面を表示してみます。

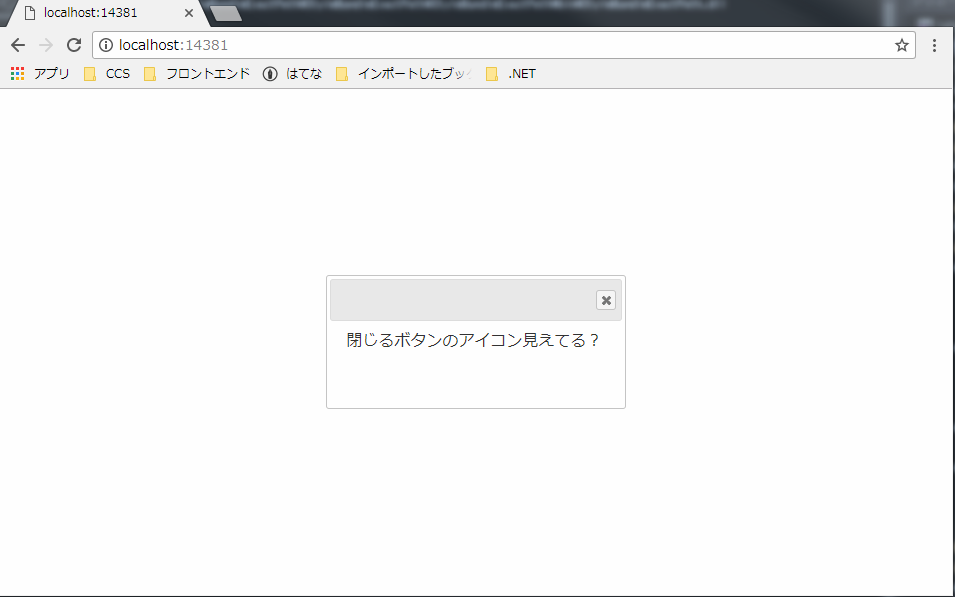
ダイアログのアイコンが表示されていませんね。
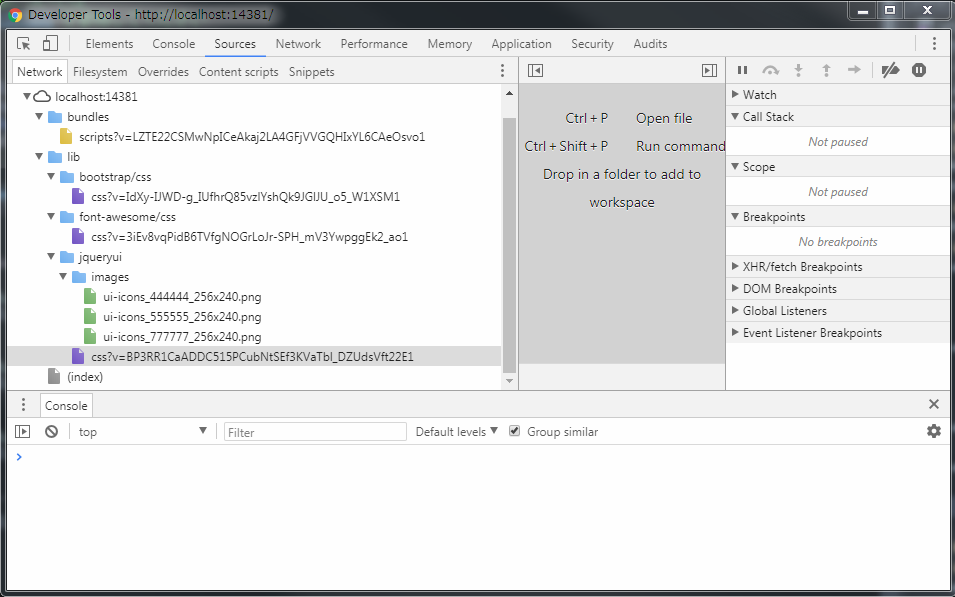
コンソールを見てみるとjquery-uiのアイコンが見つからないと怒られています。

これはスタイルシートが仮想パスにバンドルされ、バンドル先にimagesが無いのが原因です。
そこで、実際にスタイルシートが置いてある場所にバンドルするようにします。
実在パスにあわせてスタイルシートをバンドルする
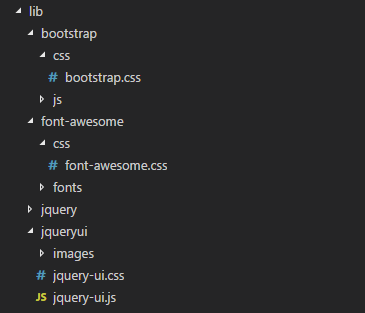
実際のパスはこんな感じです。 jquery-ui.cssが置かれているフォルダにimagesがあります。

では、ソースをこのように修正しましょう。
パスに<実在パス>/cssのように指定します。
bundles.Add(new StyleBundle("~/lib/jqueryui/css").Include("~/lib/jqueryui/jquery-ui.css"));
bundles.Add(new StyleBundle("~/lib/bootstrap/css/css").Include("~/lib/bootstrap/css/bootstrap.css"));
bundles.Add(new StyleBundle("~/lib/font-awesome/css/css").Include("~/lib/font-awesome/css/font-awesome.css"));
後はそれを画面から読み込みます。
@using System.Web.Optimization
<!DOCTYPE html>

<html>
<head>
    <meta name="viewport" content="width=device-width" />
    <title></title>
    @Scripts.Render("~/bundles/scripts")
    @Styles.Render("~/lib/jqueryui/css")
    @Styles.Render("~/lib/bootstrap/css/css")
    @Styles.Render("~/lib/font-awesome/css/css")
    <script>
        $(function () {
            $("#hoge").dialog();
        })
    </script>
</head>
<body>
    <div id="hoge">閉じるボタンのアイコン見えてる?</div>
</body>
</html>
画面を表示すると、ダイアログのアイコンが表示されていることが確認出来ます。

コンソールを見てみると画像を上手く参照出来ていることが分かります。

指定した順序でバンドルする@ASP.NET
ASP.NETでスクリプトをバンドル出来ますが、かゆいところに手が届かない部分があるのでまとめておきます。
通常のバンドル
ASP.NETでスクリプトをバンドルするとき下記のように書きます。
public class BundleConfig
{
    public static void RegisterBundles(BundleCollection bundles)
    {
        bundles.Add(new ScriptBundle("~/bundles/scripts").Include(
            "~/Scripts/jquery.js",
            "~/Scripts/jquery-ui.js"
            "~/Scripts/bootstrap.js"));
    }
}
ただし、スクリプトが読み込まれる順番はランダムなので、jquery読み込んだ後にjquery-ui読み込むといったことがデフォルトでは出来ません。
デフォルトでパス追加した順序で読み込んでくれればいいのに!
指定した順序でバンドル
まず、下記のクラスを用意します。
public class AsIsBundleOrderer : IBundleOrderer
{
    public IEnumerable<BundleFile> OrderFiles(BundleContext context, IEnumerable<BundleFile> files)
    {
        return files;
    }
}
続けて、バンドルに読み込みたい順序でスクリプトのパスを追加し、バンドルの順序を指定します。
public class BundleConfig
{
    public static void RegisterBundles(BundleCollection bundles)
    {
        var bundle = new ScriptBundle("~/bundles/scripts")
            .Include("~/Scripts/jquery.js")
            .Include("~/Scripts/jquery-ui.js")
            .Include("~/Scripts/bootstrap.js");
        // バンドルの順序をバンドルにファイルを追加した順序にします
        bundle.Orderer = new AsIsBundleOrderer();
        bundles.Add(bundle);
    }
}
後は画面で読み込めば、指定した順序でスクリプトが読み込まれます。
@using System.Web.Optimization

<head>
    @Scripts.Render("~/bundles/scripts")
</head>
DateTimeの罠
いきなりですが、下記コードを実行すると落ちます。
var unixTime = -2208988800000;
// 落ちる
var date = new DateTime(unixTime);
「1900/01/01 00:00:00」のunix timeからDateTimeを作成しようとしたコードです。
理由は「1970/01/01 00:00:00」以降のDateTimeしか作れないからです。
代わりにDateTimeOffsetを使うと上手くいきます。
var unixTime = -2208988800000;
var date = DateTimeOffset.FromUnixTimeMilliseconds(unixTime);